Skip to content
English
  • There are no suggestions because the search field is empty.

Creating an employee

How do I create a new employee?

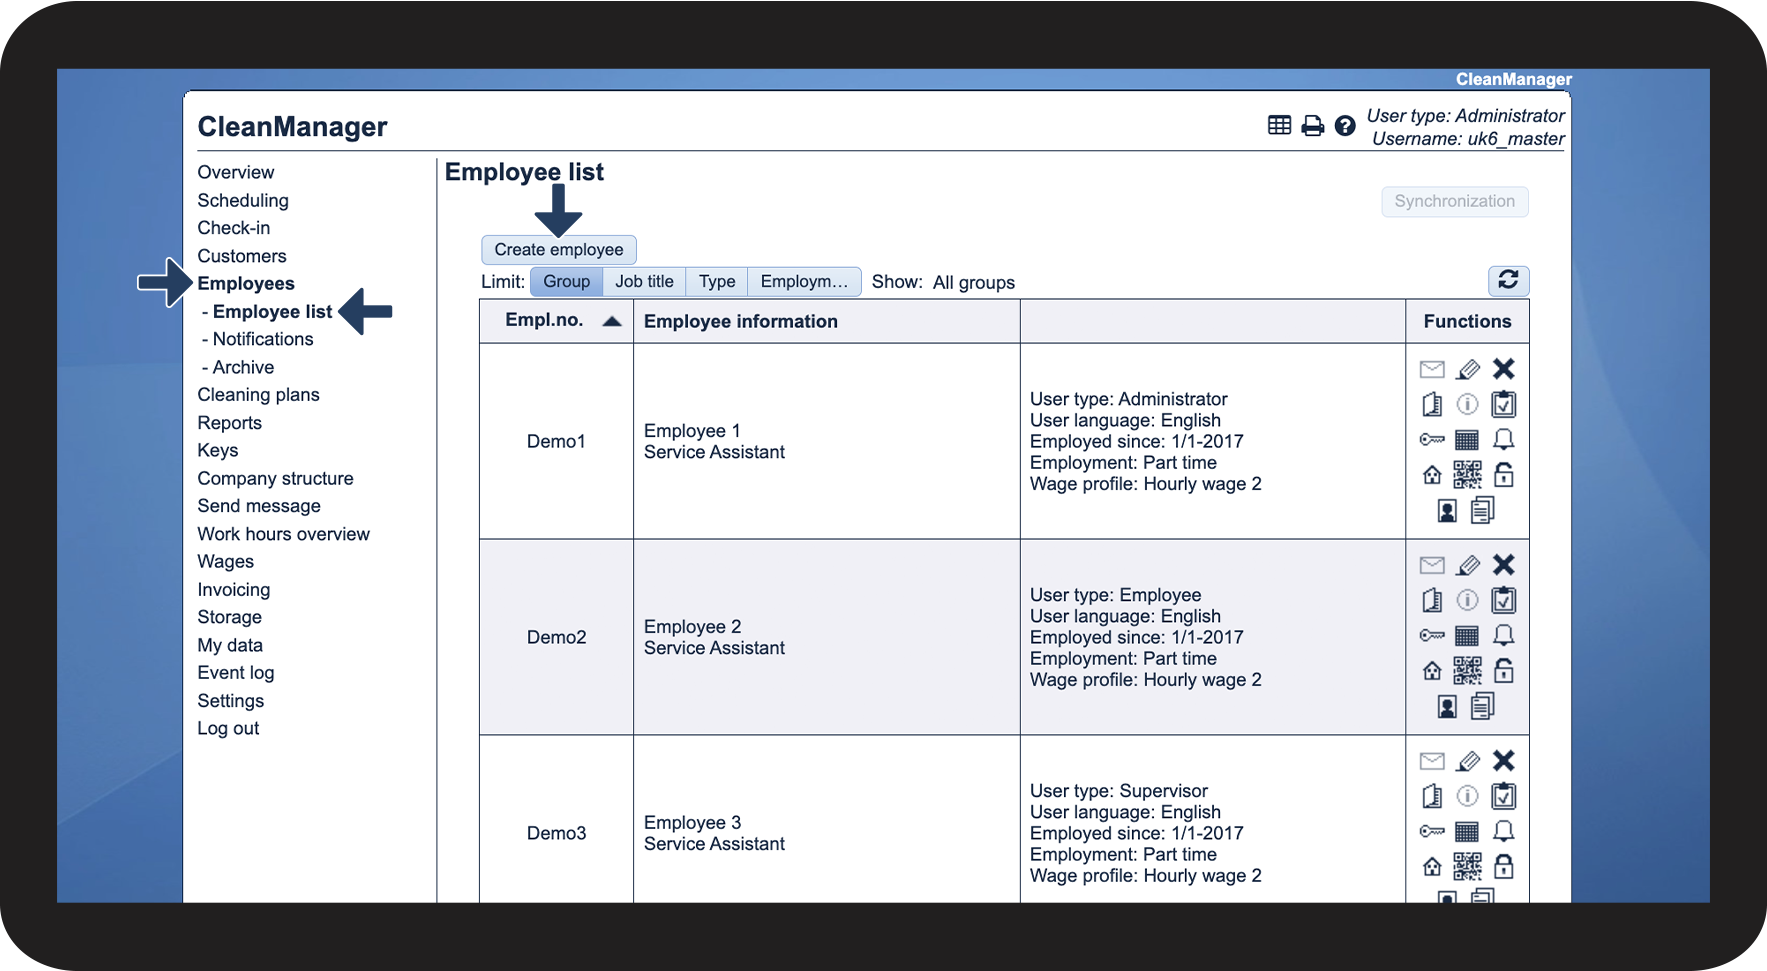
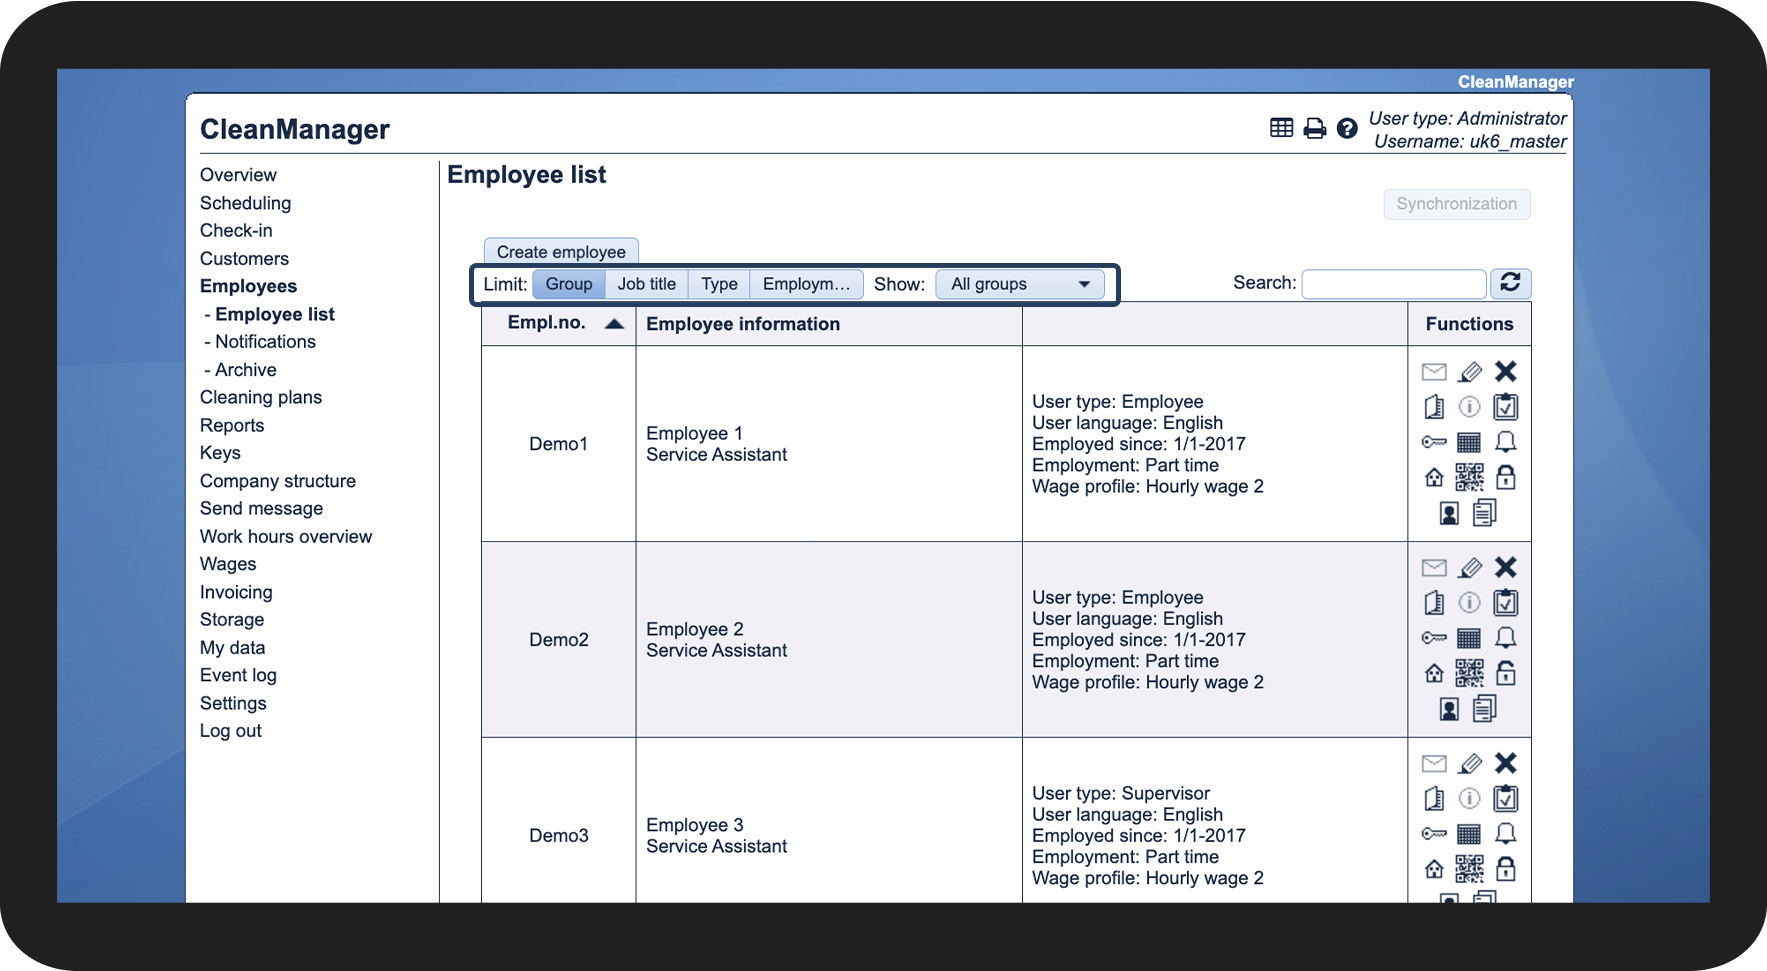
If you, as the administrator or as a supervisor, wish to assign tasks to your employees, you must first create the employees in the employee list.

The administrator as well as the supervisors can create employees in the system and fill out the relevant information.

This article will explain how the various information can affect the employees in other parts of the system, such as the use of employee groups.


In this article, you will learn how to create an employee:


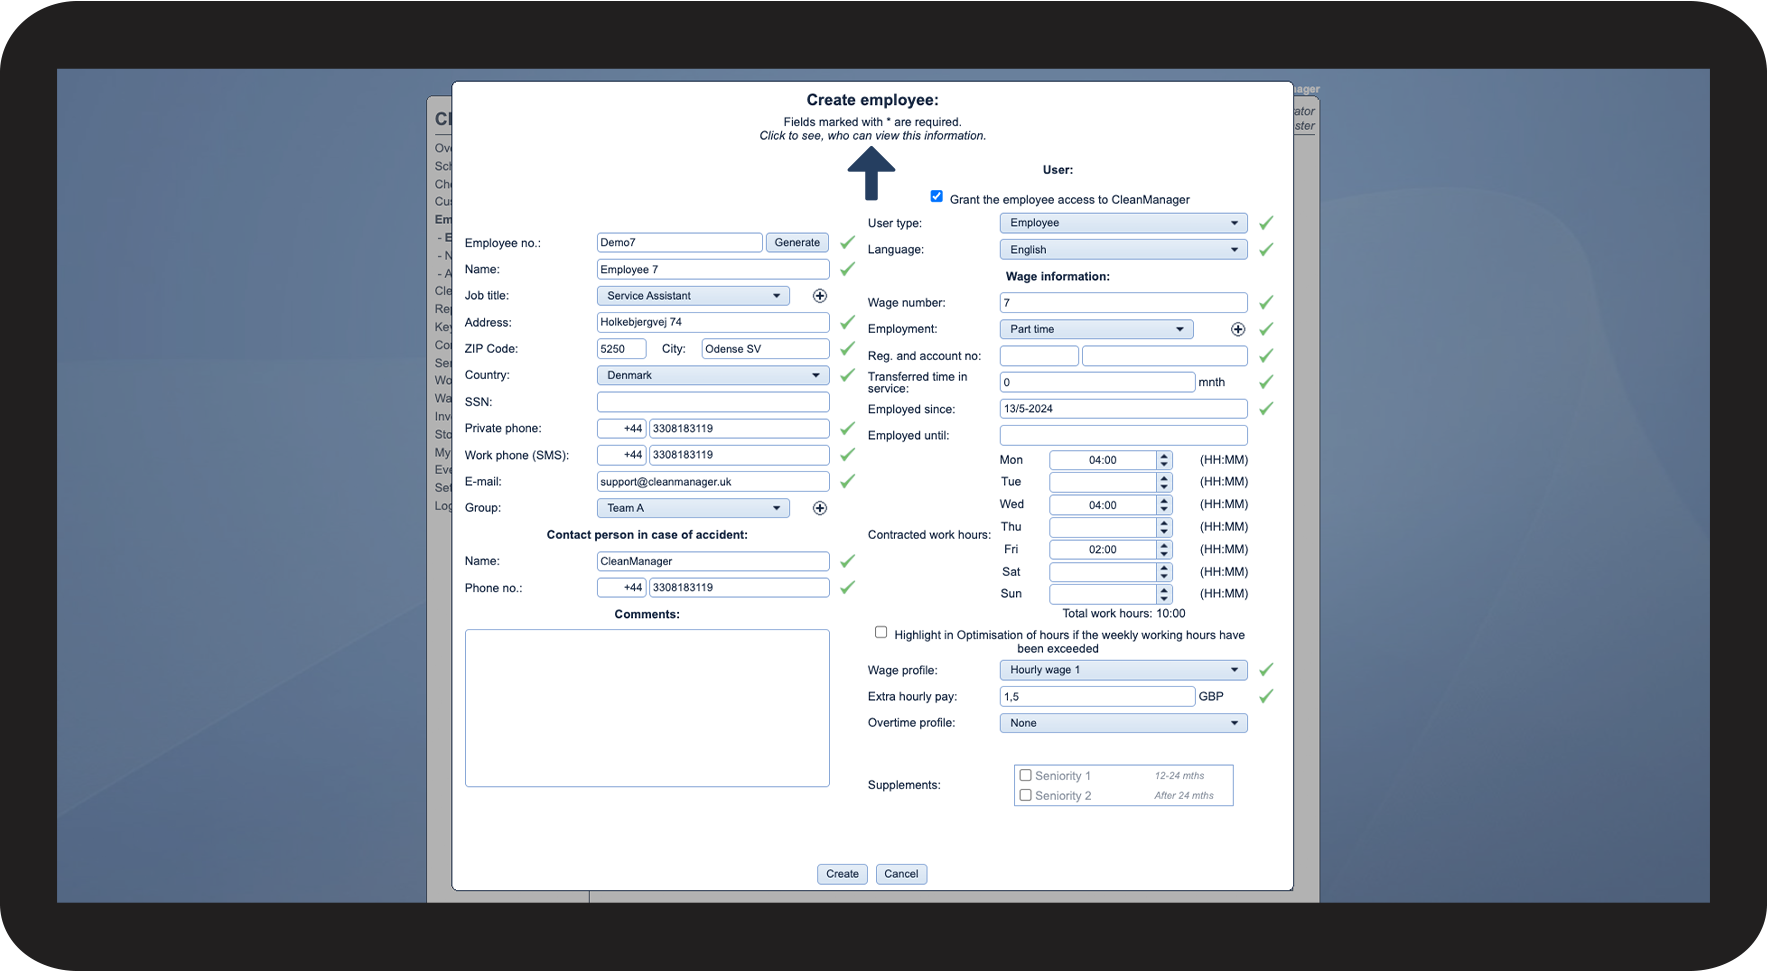
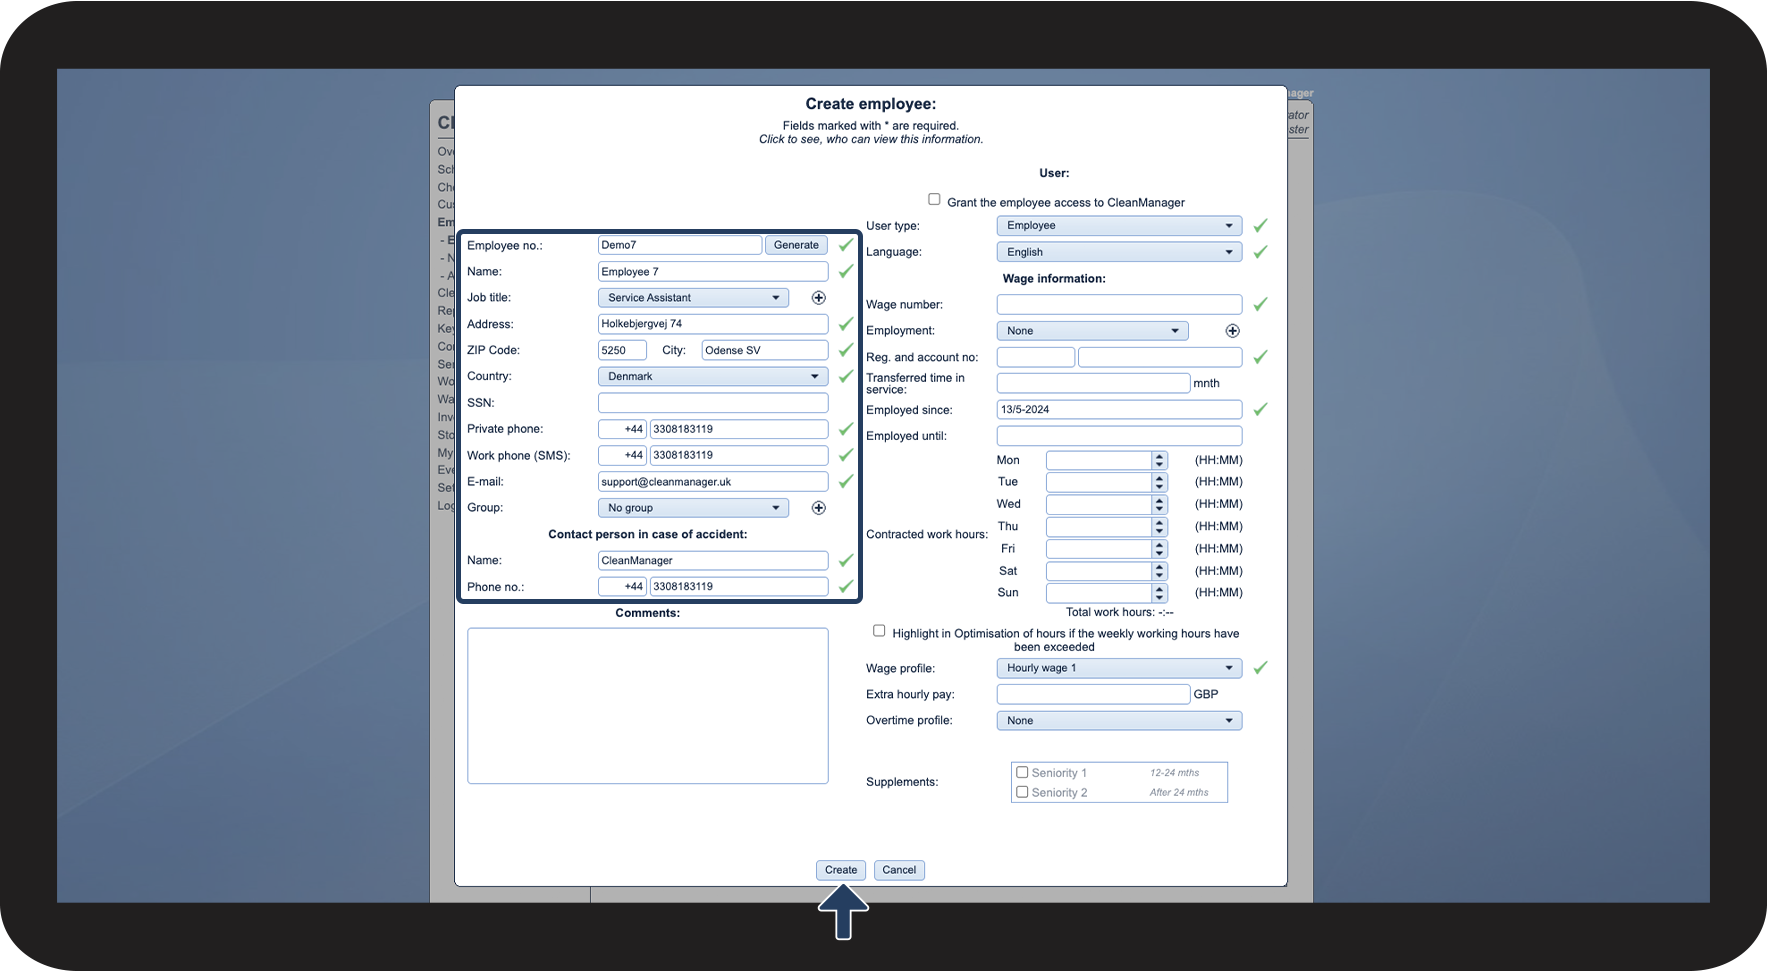
This is how you create an employee

number_1.png
In the menu, go to Employees > Employee list
 
Click on Create employee

1.1.png

number_2.png
Fill out the relevant information


NOTE:

Mandatory fields are marked by yellow followed by a *


Finally, click on Create

1.2.png


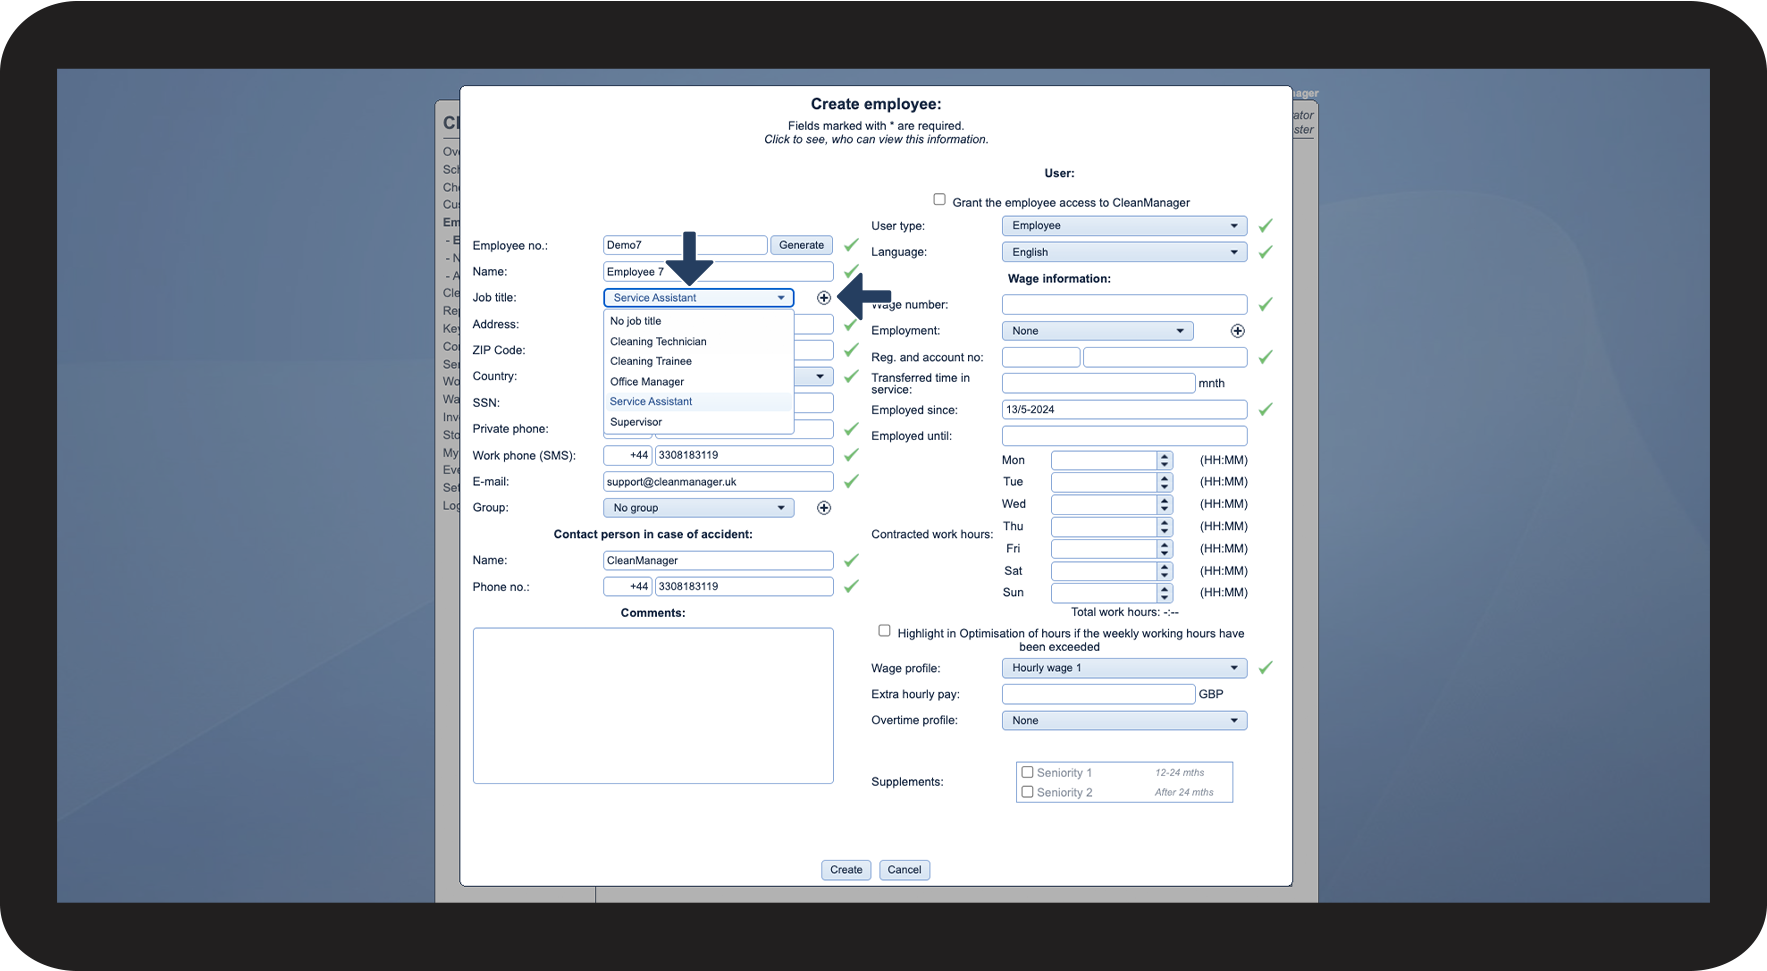
This is how the job title affects the employee

number_1.png
Select the Job title
 

You can select between existing job titles or directly create new ones.

Job titles can be created by clicking on Add tilføj.png next to the field or by going to the Company structure. You can read more about the latter in the following article: Creating employee job titles


NOTE:

Supervisors can add new job titles when they create or edit an employee. However, only the administrator can create, edit and delete job titles by going to Company structure.

2.1.png

number_2.png
Once a job title has been selected, you can use it to filter the view of your employee list. Learn more about that in the following article: Filters in the employee list

2.2.png


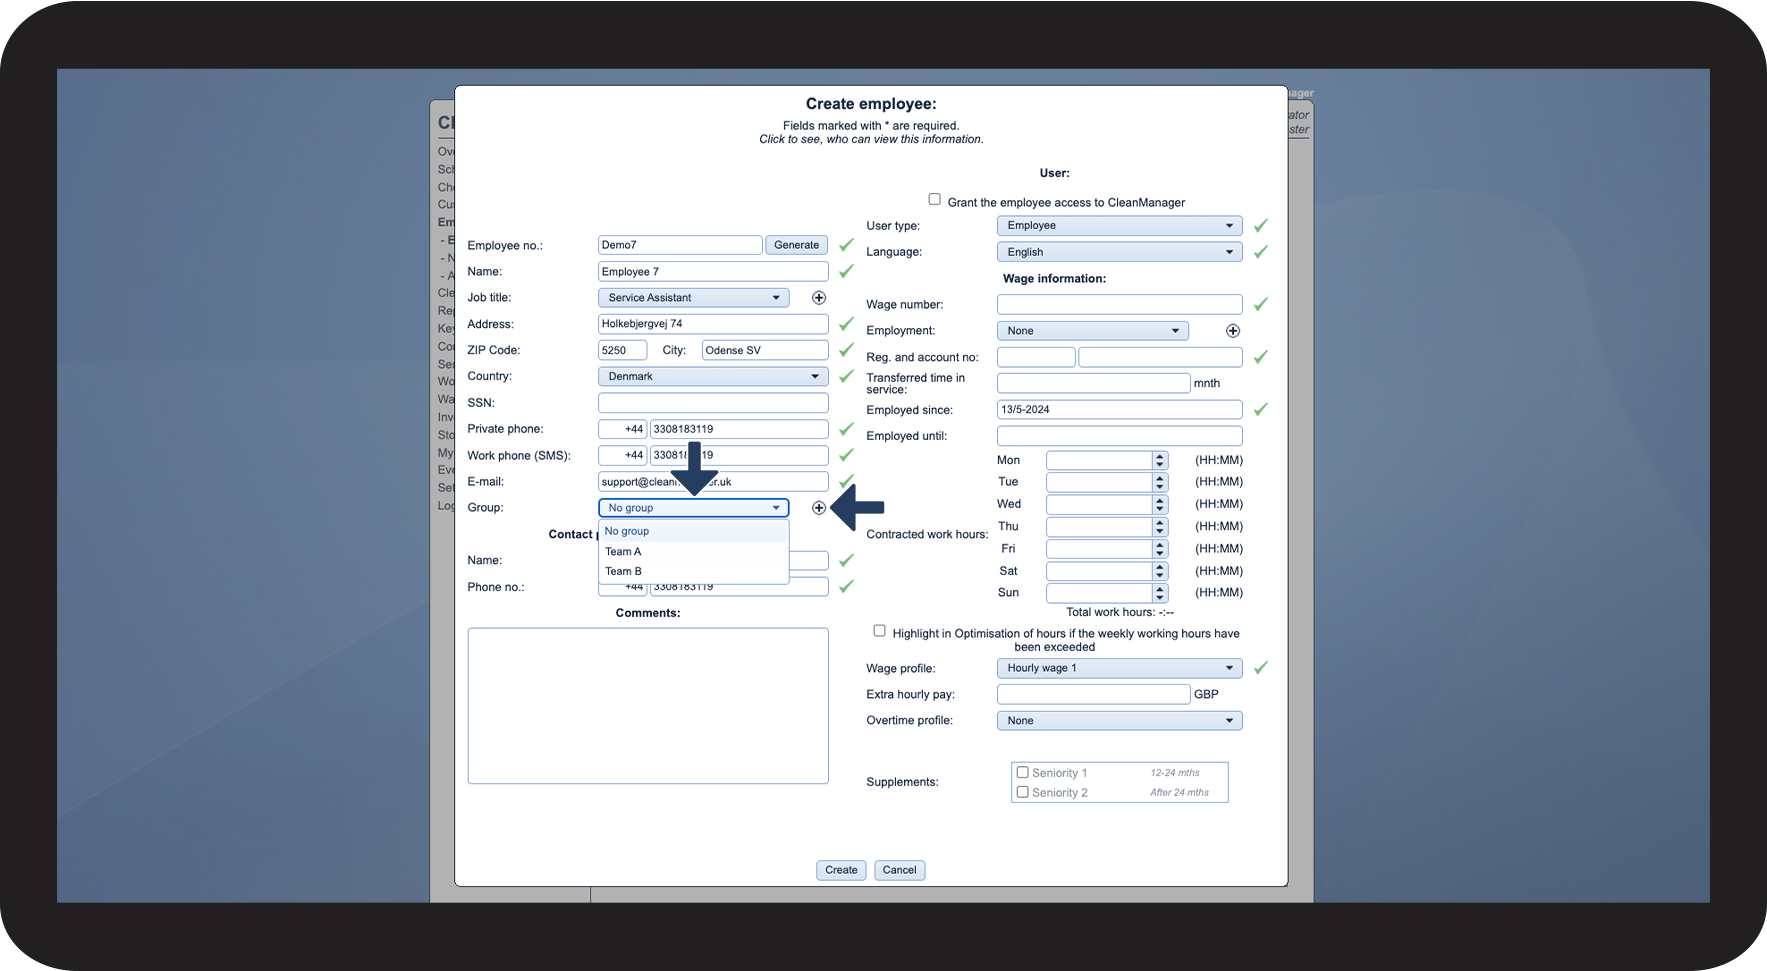
This is how the employee group affects the employee

number_1.png
Select the Group
 

You can pick between existing employee groups or directly create a new group.

Employee groups can be created by clicking on Add tilføj.png next to the field or by going to the Company structure. You can read more about the latter in the following article: How to create employee groups


NOTE:

Supervisors can add new employee groups when they create or edit an employee. However, only the administrator can create, edit and delete employee groups by going to Company structure.

3.1.png

number_2.png

Once a group has been selected, you can use it to filter the view of your employee list. Learn more about that in the following article: Filters in the employee list

3.2.png


This is how the user type affects the employee

number_1.png
Select the User type
 

You can select between the following three user types:

  • Administrator: This option is only available, if no administrator has been selected to begin with. This user type can only be selected by someone who is signed in to the master account. Read more about that here: Setting up the user type Administrator
  • Supervisor: A supervisor is a user type with enhanced permissions, allowing them to manage employee scheduling as well as handle payroll and invoicing, if the administrator has granted them this permission. After creating a supervisor, you need to assign customer areas to them, otherwise they will not be able to access any customers. Read more about how to assign customer areas here: Assigning customer areas
  • Employee: Tasks can be planned for this user type, and if you want them to log their start and end times for tasks, they will additionally have to be granted access to the system. The CleanManager app can be used for precise time registration if the add-on module App with Time Registration has been activated in your system.

4.1.png

number_2.png
Select the Language


Here, you can pick between Danish, English, and German.

Your choice determines the system language for the employee when they log in to CleanManager. Employees can change their user language as well, by following the guide in the article: Changing the account language as an employee

4.2.png


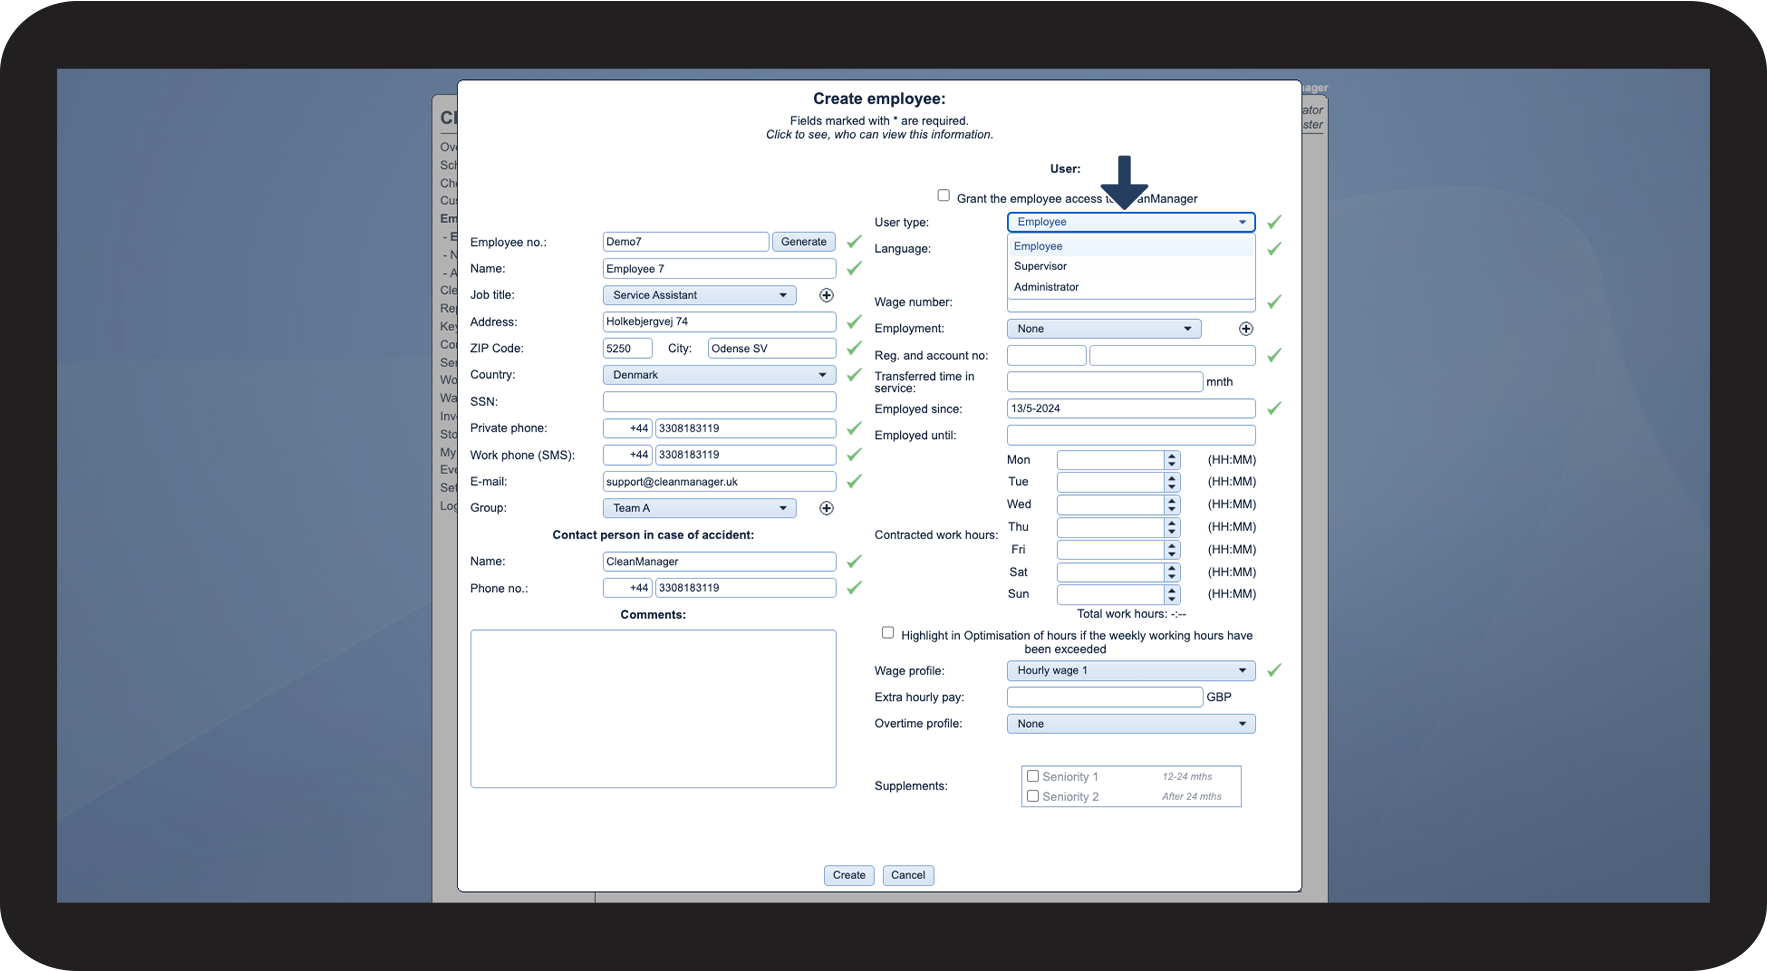
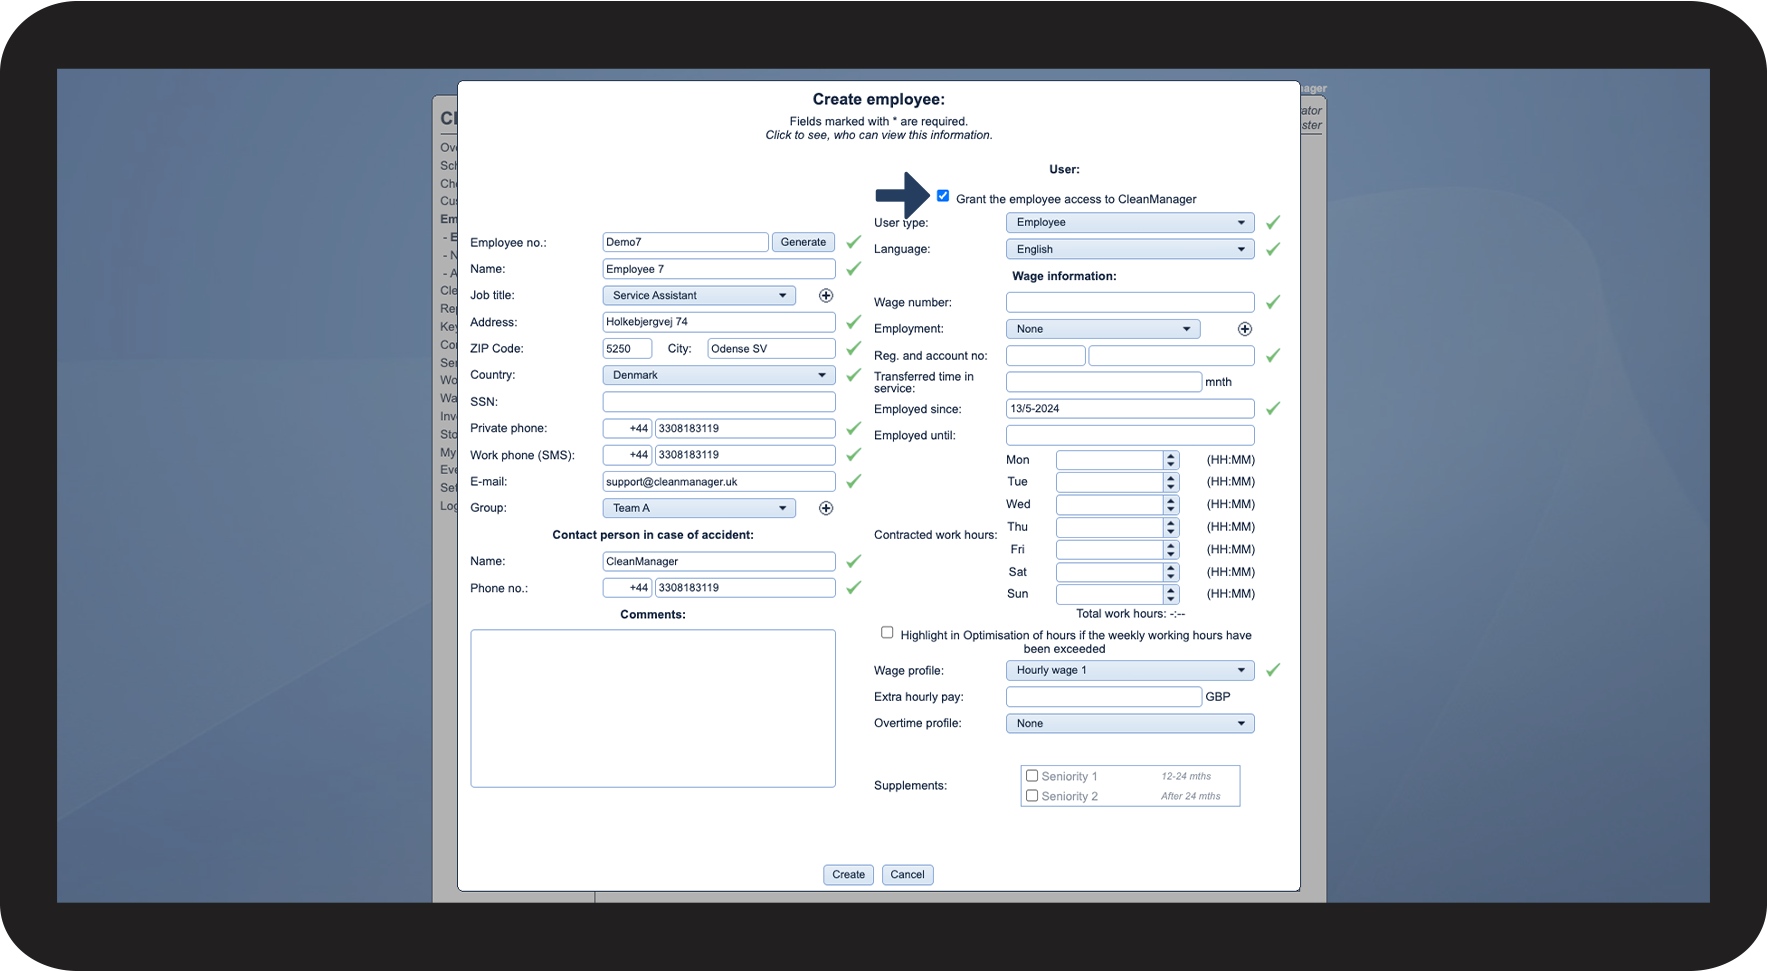
This is how you can grant the employee access to CleanManager

number_1.png
Tick off Grant the employee access to CleanManager for the employee
 

The employee will receive an e-mail with their username and password.

You can grant them access immediately when you create them, or you can do it later by editing the employee.

5.1.png

number_2.png

The employee can also be granted access the following way:


Click on Edit employee access Hængelås - Lukket.png in the functions-column


To learn more about this function, go to the following article: How do I grant an employee access?

5.2.png


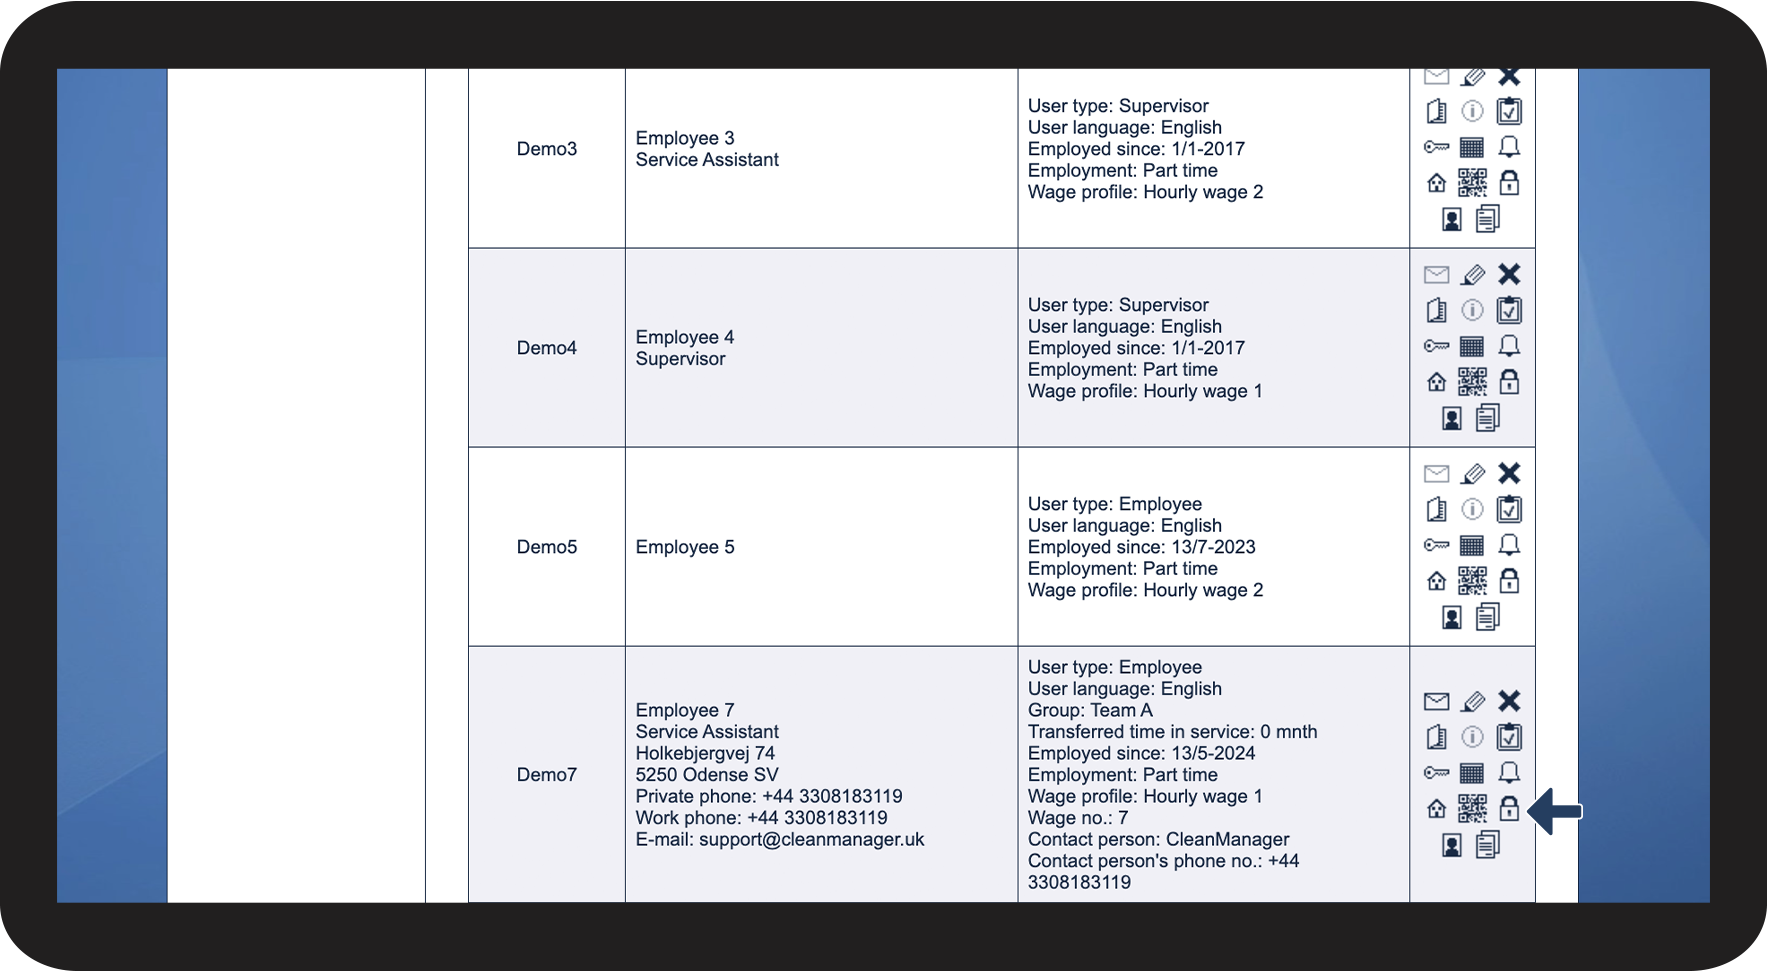
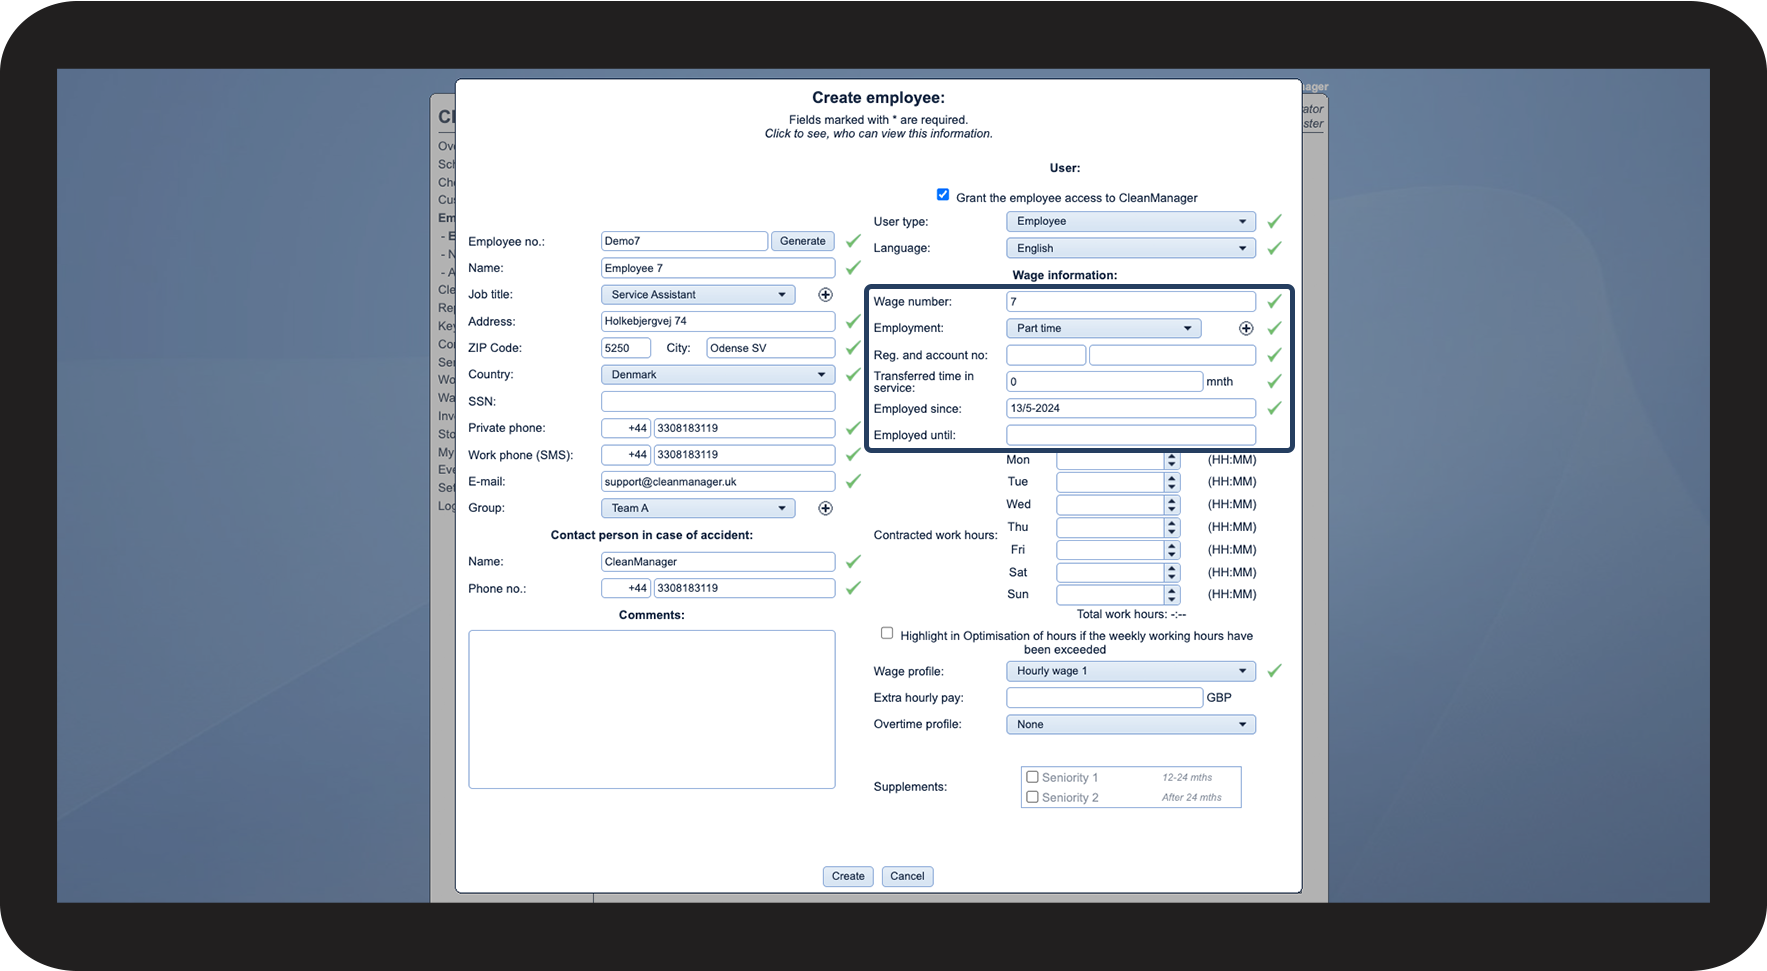
This is the meaning of the wage information

number_1.png
Fill out the relevant wage information:
 
Wage information
Meaning
Wage number

The wage number is used for the wage export in order to identify the correct employee in your payroll system.

 It is recommended to always fill out the wage number.

Employment

Here, you can select the employment type for the specific employee. Learn more in the following article: Creating employment types

Transferred time in service

If your employee has experience from a prior job, you can enter it here. The length should be added in whole months.

This way, your employee can be eligible for supplements from the start of their employment.

Employed since

Start of employment.

This date will be used to calculate when certain supplements should be triggered.

Employed until

End of employment.

You can use this field if you know the end date for the employee's employment, e.g. if it's a temporary cleaner.

6.1.png


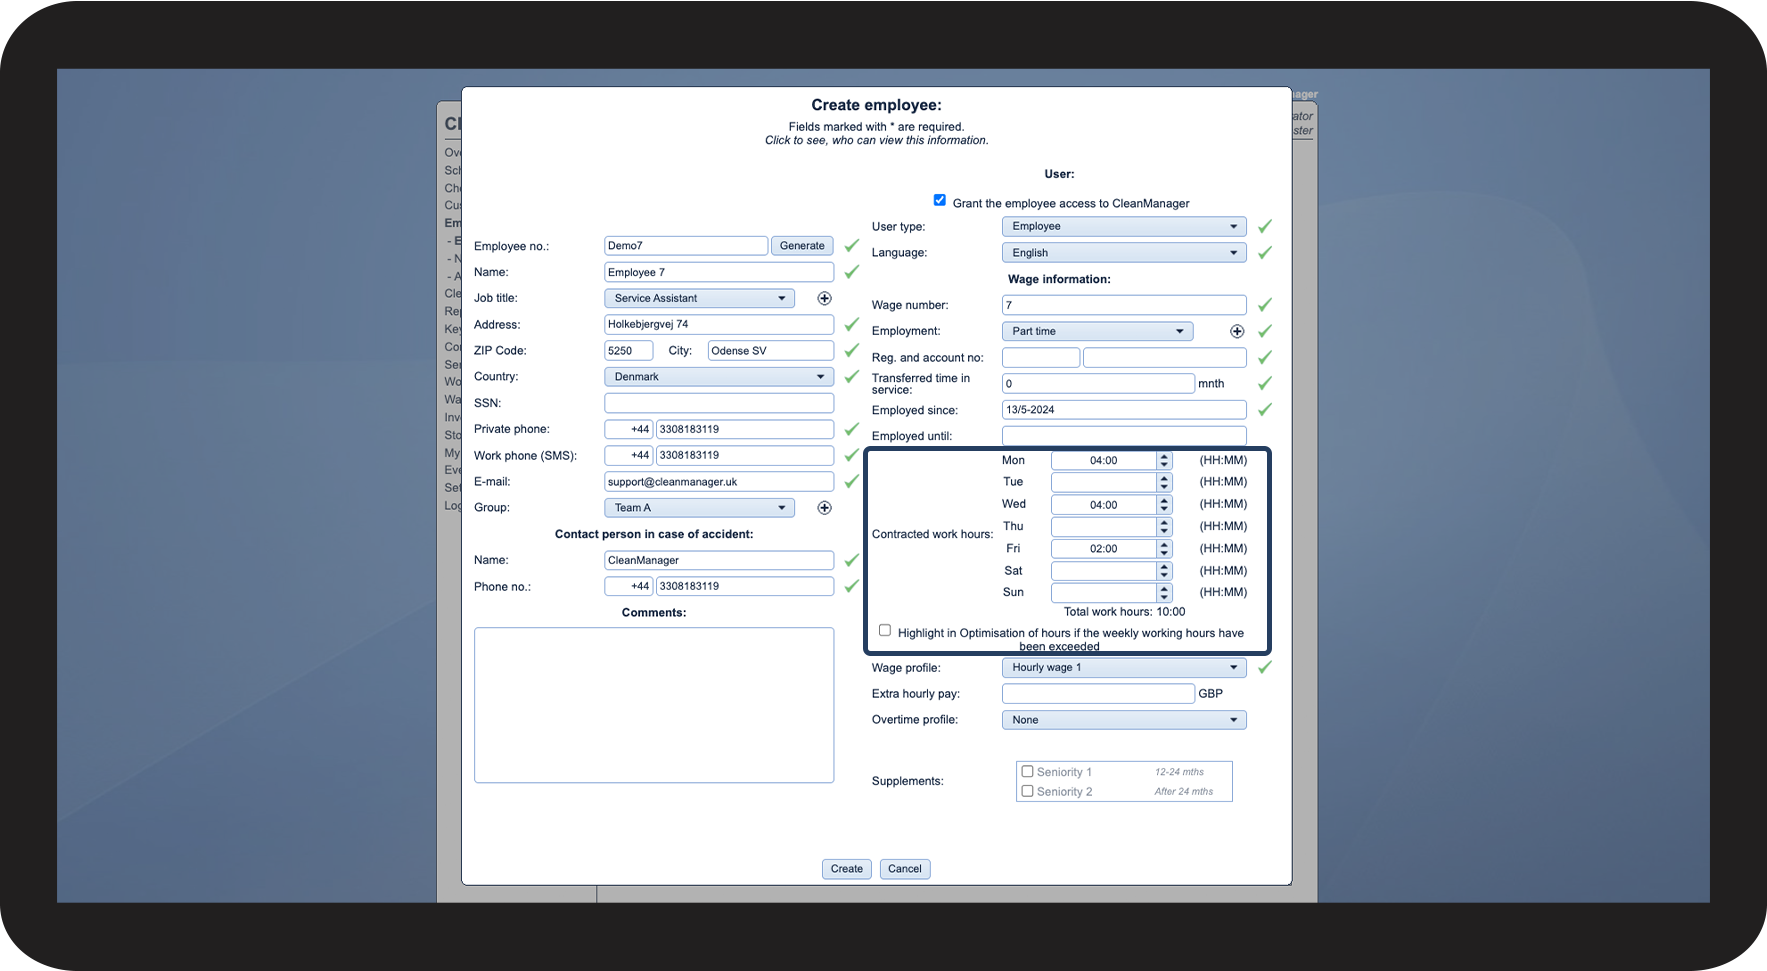
This is how you use the contracted hours

number_1.png
Adjust the daily work hours
 

When you set up the daily work hours, the total weekly work hours will be calculated.

In the employee view of the new calendar, you will be able to see if you have exceeded the weekly work hours of the employee or if they still have time for more tasks.

You can also enable the setting Highlight in Optimisation of hours if the weekly working hours have been exceeded. If you do this, the box Optimisation of hours will turn red in the Overview, whenever an employee exceeds their weekly work limit by a minute or falls short of it by more than three hours.

You can access the overview through Wages > Optimisation of hours, as well as through Overview > Optimisation of hours

7.1.png


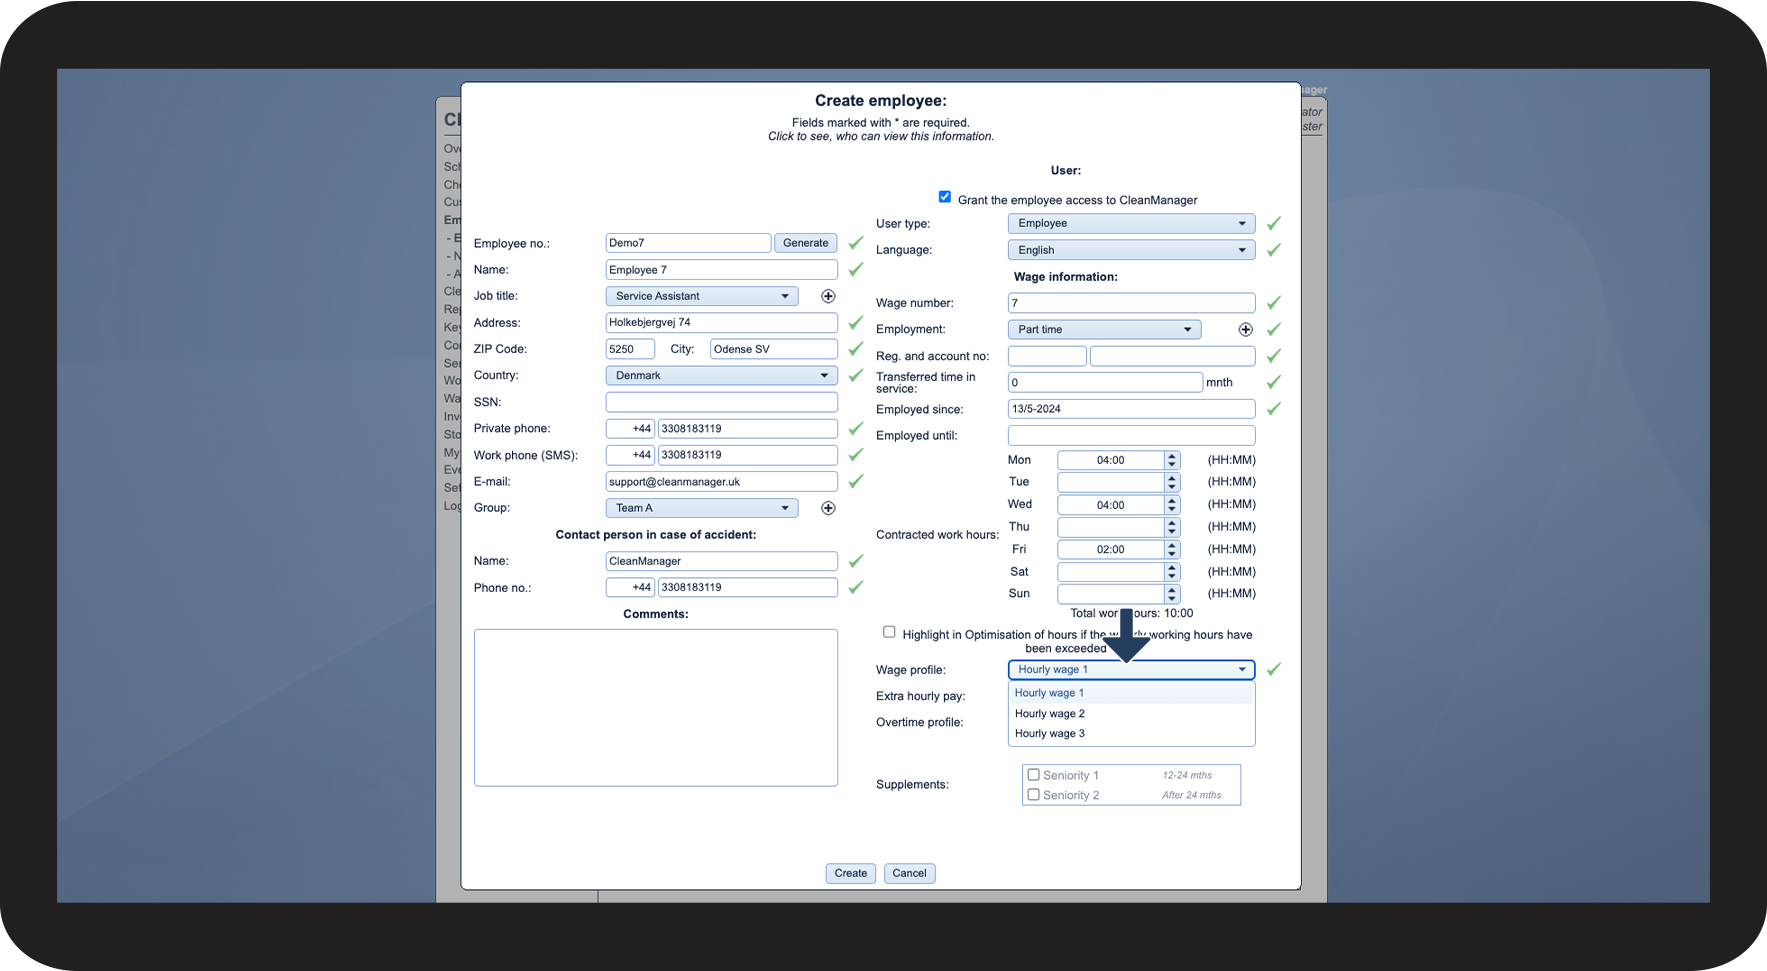
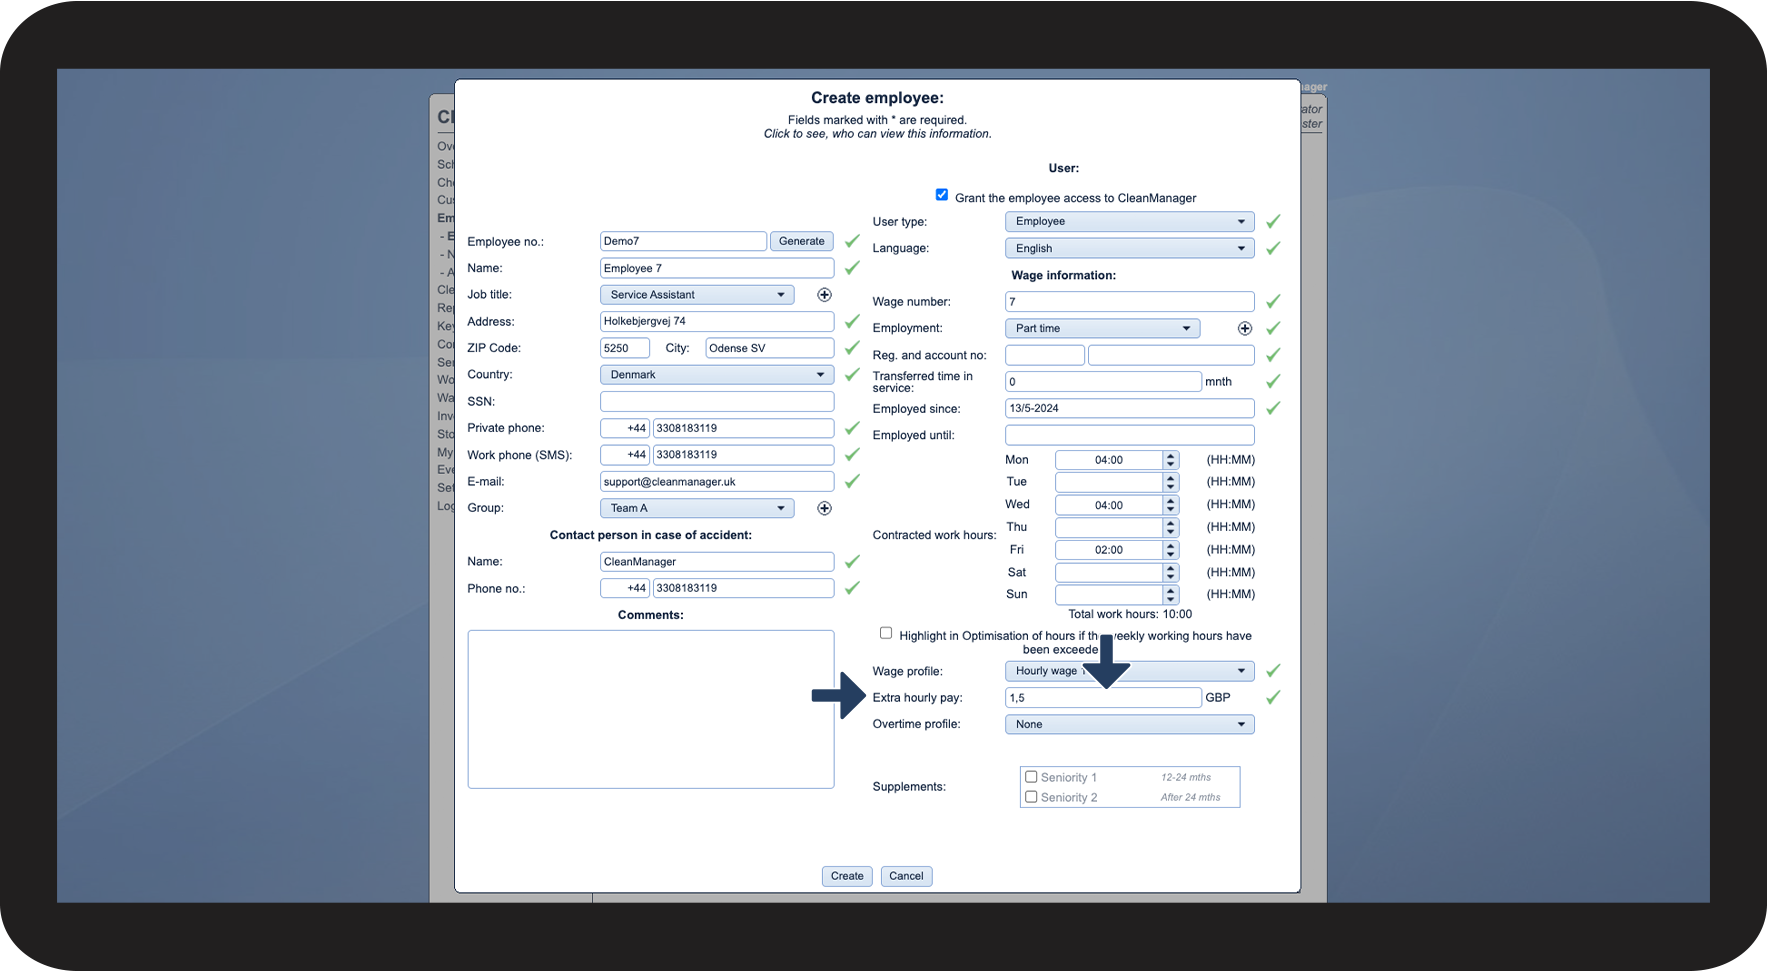
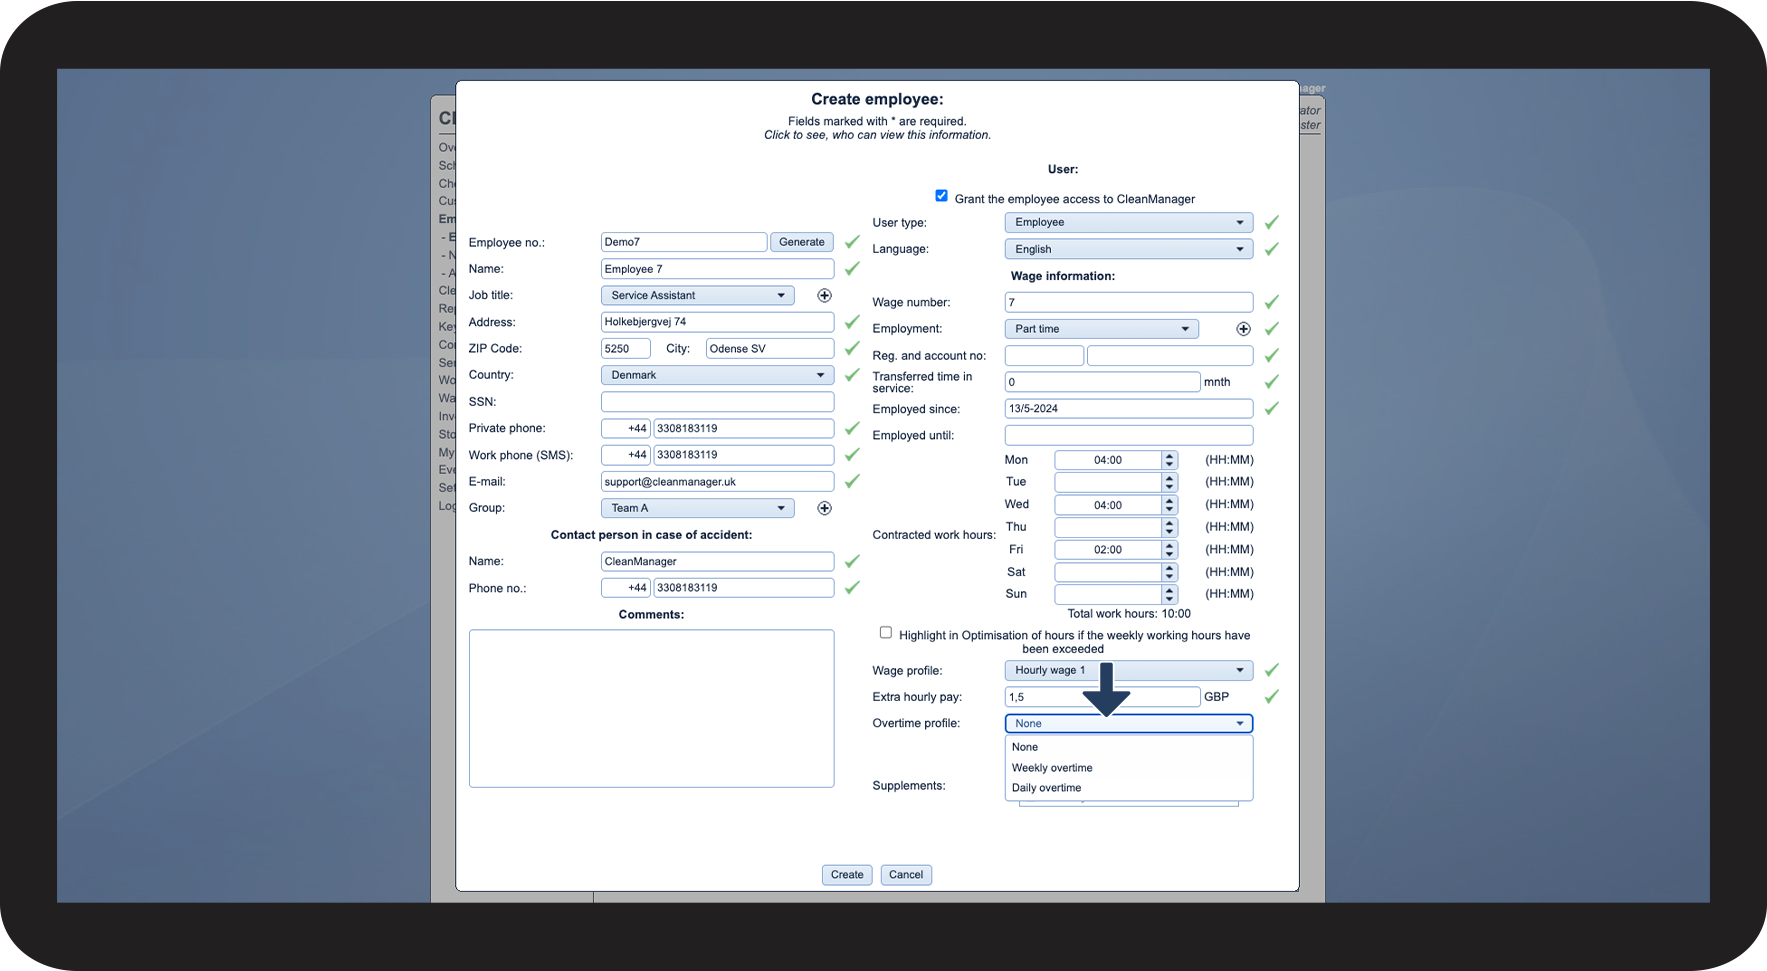
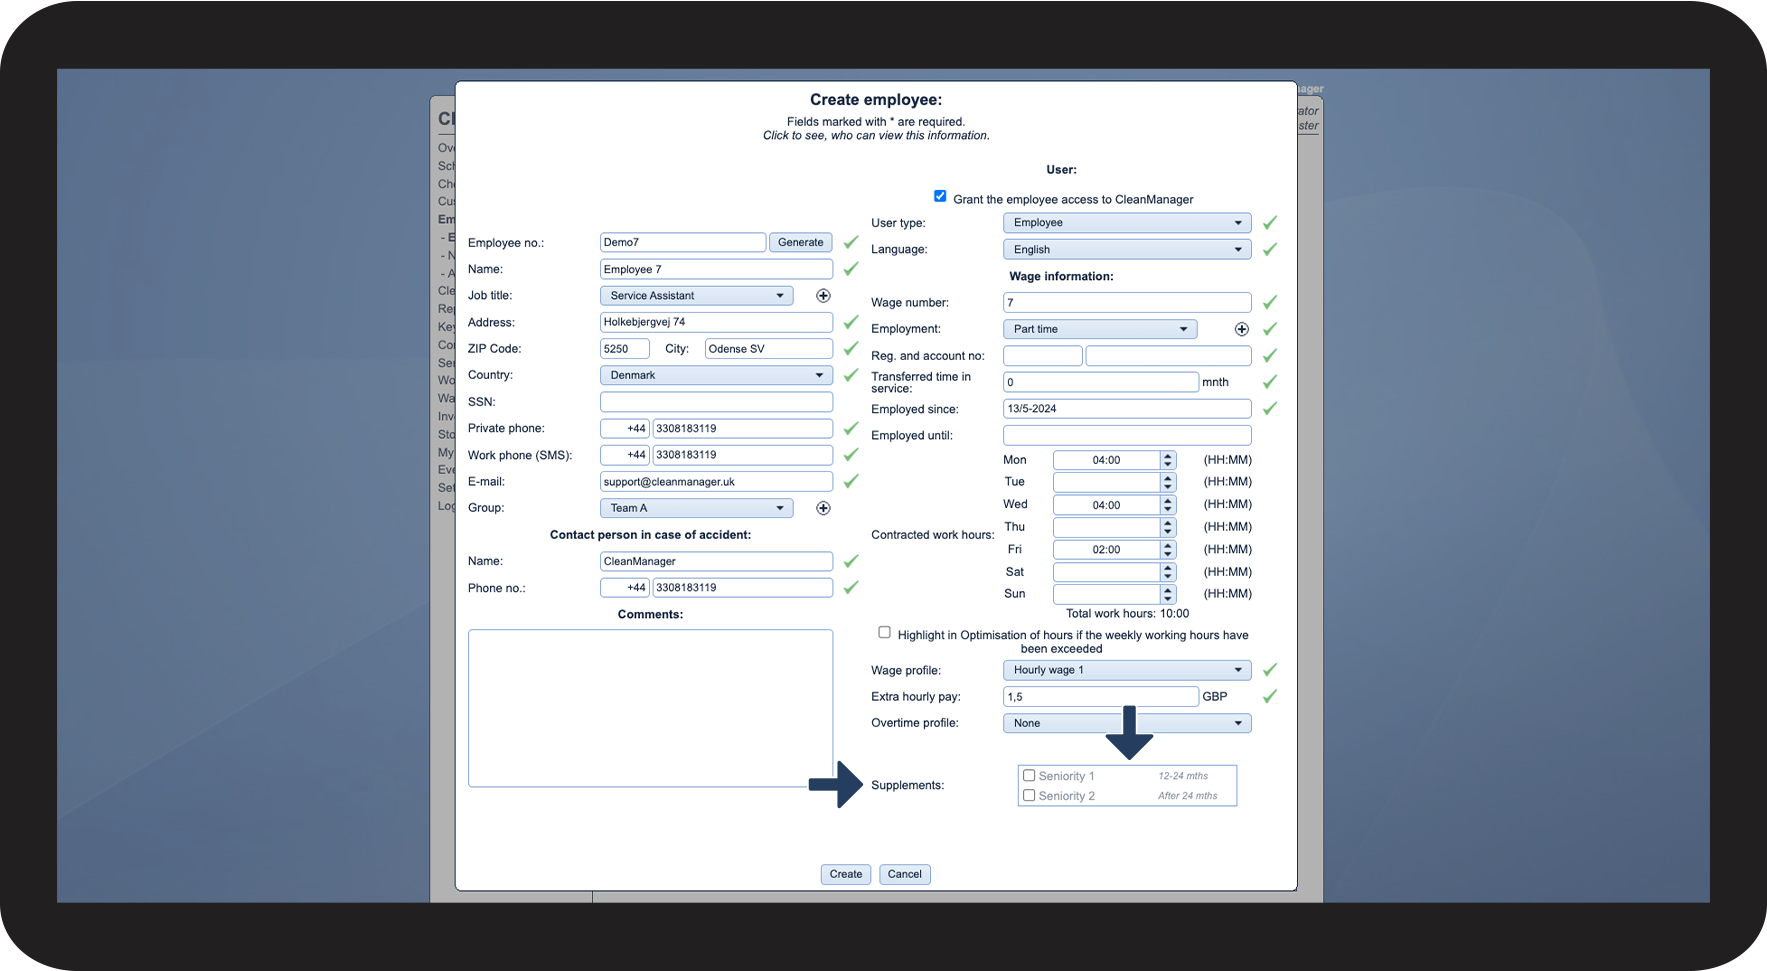
This is how you set up the correct wage for an employee

number_1.png
Select the Wage profile
 

Pick the correct wage profile for the specific employee. You can learn more about setting up wage profiles in the following article: Wage profiles and hourly wages

8.1.png

number_2.png

Enter Extra hourly pay


You can use this field if you want to pay your employee an extra amount on top of their hourly wage.

The extra wage will be added to the regular hourly wage in the wage export

8.2.png

number 3 copy.png

Select the Overtime profile


Pick the overtime profile that fits the employee. You can learn more about setting up overtime profiles in the following article: Overtime profiles

8.3.png

number 4 copy.png

Select the Supplements


Here, you can pick which personal supplements should be triggered for the employee in question. You can learn more about setting up personal supplements in the following article: Personal supplements

8.4.png


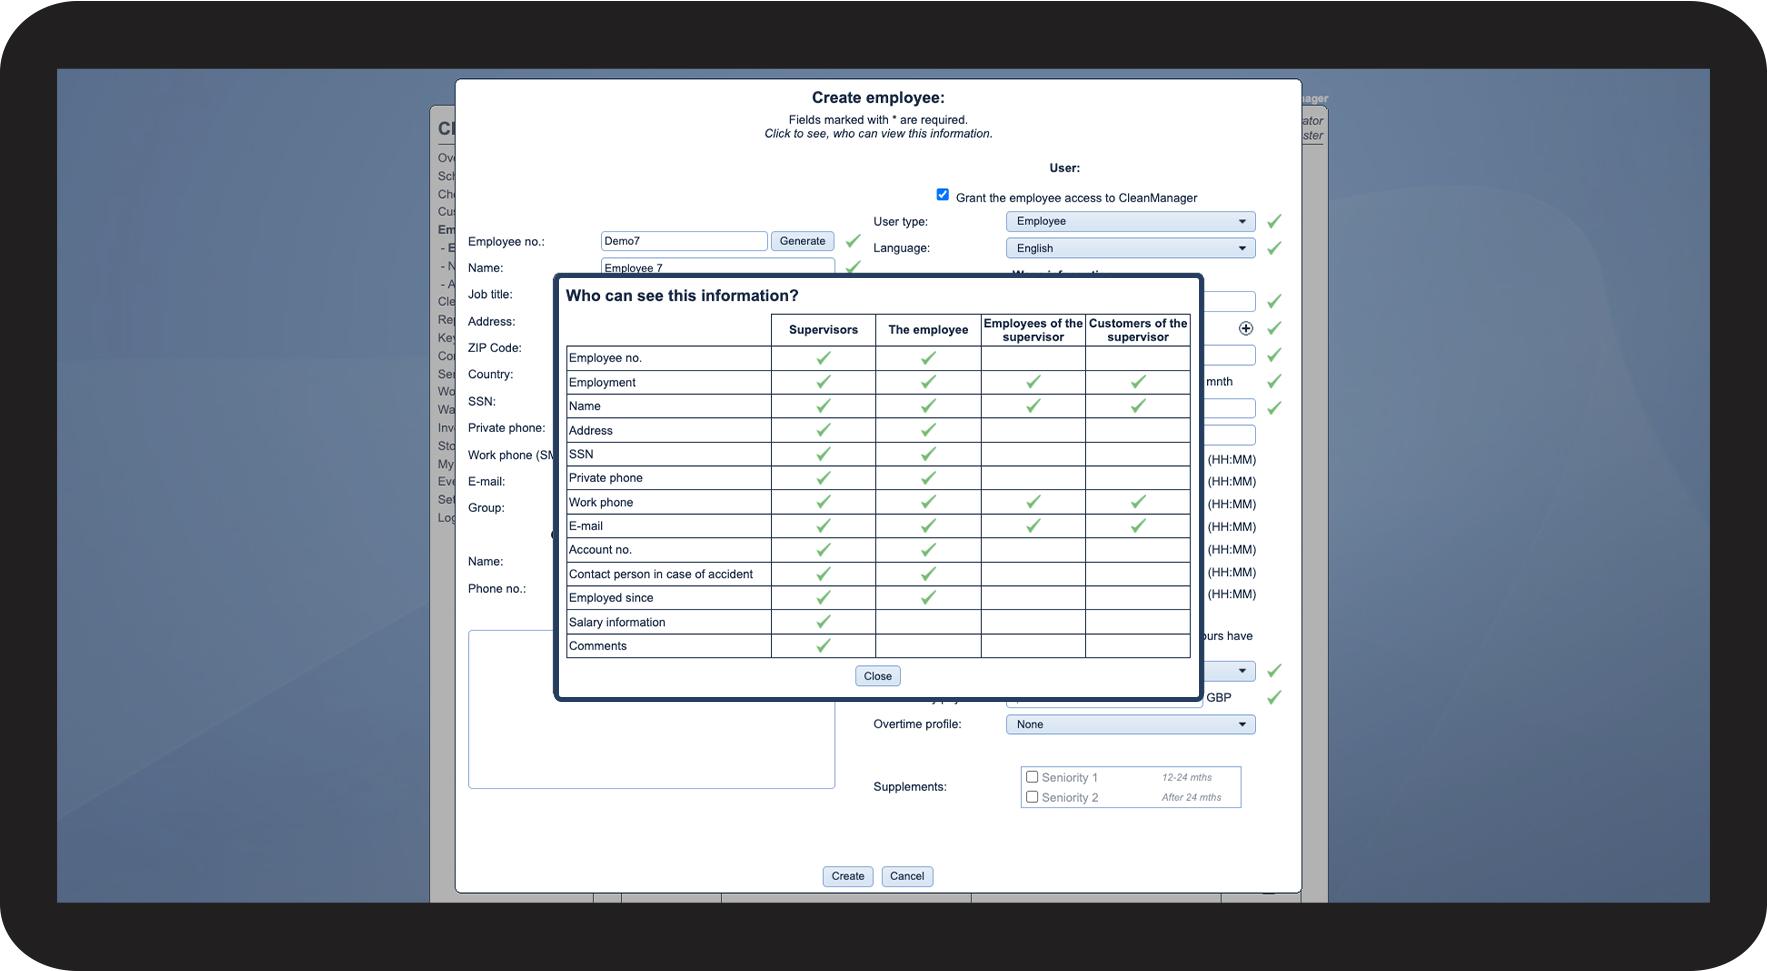
This is how you can see what information the different user types have access to

number_1.png
When creating or editing an employee, you have the option to see an overview of which information the different user types can see
 

The two ways of finding this overview are as follows:

  • Click on Create employee and thereafter on Click to see who can view this information
  • Click on Edit employee and thereafter on Click to see who can view this information

9.1.png

number 2 copy.png
In the overview, you can see what information the different user types have access to

9.2.png